- Bill of Materials for 20 Nano Mice
- Bill of Materials for 10 Logo Mice
- Bill of Materials for 20 espMice
-
 All official Arduino Nanos, and many Arduino Nano clones use the standard FTDI Chip drivers which you can download from http://www.ftdichip.com/Drivers/VCP.htm (not necessary for Windows 10 users).
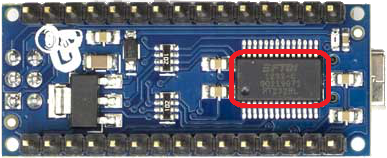
Some Arduino clones use a CH340/CH341 USB to serial communication chip and the standard drivers won't work. To program it, you must download and install the CH341 drivers from http://www.wch.cn/downloads.php?name=pro&proid=65. Warning!!! The CH340/CH341 chips do not work well. I highly recommend you buy Arduinos or Arduino clones that use FTDI chips.
To tell which type of driver your Arduino uses, flip it over and look at the chip on the back. It will either say FTDI or CH340 (along with some other letters and numbers).
- Soldering Safety
- Always wear eye protection.
- Do not touch the hot end of the soldering iron (you will get an instant 3rd degree burn).
- Always put the soldering iron back in its stand. Never put it down on your workbench.
- Keep the soldering iron's cable safe (away from hot end).
- Never pass a soldering iron to another person.
- Turn off (or unplug) the soldering iron when you are done with it.
- Wash your hands when you are done soldering.
Although the How to Make a Nano Mouse video is specific to the Nano Mouse, I suggest you watch it (but don't start building) just to get a general idea of what you're about to do. Then, follow the instructions in the slideshow.
LEDs & Buttons LEDs & Buttons
- espMouse Note #1: The onboard LED for the Adafruit Feather Huzzah ESP8266 is attached to pin 2 and is turned on when the pin is set LOW (counterintuitive and annoying). For this reason, you will need to add a line of code prior to the while loop that sets the led HIGH to turn it off and change the line of code that comes after the while loop so that it sets the led LOW (to turn it on after the button is pressed).
- espMouse Note #2: The How to Make an espMouse slideshow directs you to connect the button to pin 0, so change your code accordingly.
-
espMouse Note #3: You will need to add
yield();inside the while loop that is used to listen for the button press. For information on why, refer to https://github.com/esp8266/Arduino/blob/master/doc/reference.md#timing-and-delays
Test and Calibrate Your Servo Motors Test and Calibrate Your Servo Motors
- espMouse Note: The How to Make an espMouse slideshow directs you to connect your Servos to pins 14 & 12, so change your code accordingly.
Control the Servo Motors Control the Servo Motors
forward() Function forward() Function
- SM-S4303R Servo Note: Originally I made these videos with Parallax motors which have a range of 1500±200, and for reasons that will become clear later in the course I instruct you to power your mouse at half speed (100). I have since switched to using the SM-S4303R servos which have a range of 1500±500. If you are using these motors, you should set the power level for your mouse at 250 (half power).
-
SM-S4303R Servo Note: These servos turn in the opposite direction compared to the Parallax motors used in this video. As a consequence, you will need to reverse the maner in which power is added to and subtracted from the stop signal as follows:
From now on, you should commit your code every time you finish a lesson.
- SM-S4303R Servo Note: Remember, these servos turn in the opposite direction compared to the Parallax servos. As a consequence, you must reverse the manner in which power is added to and subtracted from the stop signal (see the note from the forward() Function lecture).
Once you are able to make your robot move forward and turn as desired, challenge yourself by programming your robot to do the following. Work through Khan Academy's Intro to JS course to get a better handle on programming prior to attempting this challenge. If you don't want to work through the entire course, then just work through the following sections: Feel free to ask questions. This is a difficult challenge. You are not expected to complete it independently.
- Create a square() function that will make your robot trace the path of a square.
- If you haven't already, use a for loop to eliminate any repetitive code. (In addition to learning about for loops via Khan Academy or Code.org, you can also refer to the Reference section of the Arduino website).
- Modify your function to include an argument to control the size of the square.
- Create a similar function to trace the path of an equilateral triangle.
- Create a polygon function with arguments to control the size and number of sides.
The functions you have created so far will allow you to draw polygons and navigate a maze, but they do not give you full access to your robot's artistic abilities. Whenever I want to make a robot draw something cool, I add a move() function that allows me to easily control both motors with a single command:
With this function I can easily make all kinds of interesting designs. For example, try putting this at the end of your setup:
Can you make a spiral? (Hint: you'll need to put your move() function in a loop). What other designs can you make?
This section of the course covers how to remotely control your Nano/Logo/esp Mouse. If you do not have the hardware or the desire to complete this section, you can safely skip it and still learn everything you need to make your Nano Mouse solve a maze.
That said, learning to remote control your robot is a lot of fun. You can control a Nano/Logo mouse using the track pad of a Macintosh computer, or the accelerometer of an Android phone/tablet. You can control an espMouse using any WiFi enabled device (including iPhones and Blackberries).
Personally, I prefer writing an Android specific app that uses Bluetooth. The Nano/Logo mice work better, and the communication between the remote and the receiver is more robust. If you do not have an Android tablet or cell phone, I highly recommend purchasing one because writing your own Android apps is easy, free, and fun with App Inventor 2 (this is not the case with Apple products). Also, Android phones/tablets are equipped with various sensors that you can use to augment what you do with your Arduino (or any other microcontroller for that matter). Amazon's Kindle Fire is almost certainly the least expensive tablet you can purchase for this purpose and is what I use with my students. If you are an educator working with a classroom full of students, you can get away with just a few tablets as your students will likely reach this section at different times.
-
Android
In order to build your own app to remote control your Nano/Logo Mouse, you need access to App Inventor, which is a web based program that requires users to login with a Google account. I highly encourage you to make an extra effort to access App Inventor as it is a fantastic tool to create real apps quickly and easily. However, if that simply is not possible, use my NanoMouseRemote app.
Prior to coding an Android app to remote control your robot, I recommend working through some beginner tutorials so that you understand what you're doing before you work through my video tutorials.
- App Inventor Servers
- Massachusetts Institute of Technology (MIT)
- Guangzhou Education Information Center (China)
- Computer You will need a computer that has Bluetooth. I've found that Apple computers connect to these Bluetooth modules without any problems, whereas PCs running Windows are much less reliable.
- You may have noticed that when you disconnect from your robot while it's moving, it continues to move. Fix this bug so that your robot stops when you disconnect from it.
- Send and receive a 3rd message from your Android device to your Arduino to control the onboard LED.
- Send and receive a 4th message from your Android device to your Arduino to "honk a horn" (make noise with the buzzer).
After making this video, I discovered I got better results if I put the line that creates the access point towards the top of the setup (directly below the 1000 millisecond delay), and the code that creates the servo objects and sets them to stop towards the bottom of the setup.
At this point I highly suggest you break down and start learning to use Git. Both codecademy and Udacity offer free courses that explain how to use this tool.
- Logo Mouse Note: The left detector is connected to pin A7. See the Logo Mouse page for more info.
This video only covers how to write the code. To understand the theory behind and the benefits of filtering out ambient light, watch the original Nano Mouse version of this lecture (just don't follow along with the coding portion).
- espMouse Note: This lesson was originally created for the Nano Mouse, but you should be able to follow along and use it to add smoothing to your espMouse's sensors. Just don't change code you wrote in previous sensor lessons to match what was developed prior to this video.
- SM-S4303R Servo Note: Remember, these servos turn in the opposite direction compared to the Parallax servos. As a consequence, you must reverse the manner in which power and the error term is added to and subtracted from the stop signal (see the note from the forward() Function lecture).